orchid reproduction and meristeming....
In nature initial fertilization of the orchid flower must take place for the seed pod to develop, and this article will focus on the principle of natural fertilization (well almost) and propagation.
An insect when pollinating a flower usually does so by collecting the pollen sacks from one plant (a forced occupation as the pollen plant by various clever means deliberately sticks the pollen sacks to the insect as it departs) and depositing them on the stigmatic surface of its next orchid flower as it strives to collect its reward of a little nectar.
Man can do the same thing, usually with the aid of a toothpick and the two pollen sacks seen on the left are about to be deposited onto the stigmatic surface of the pod parent plant where they will adhere, and the minute pollen grains will embed themselves into the sticky bed and nature will begin to take its course.
In a few days, providing the seed was viable, the flower will shrivel and the column will swell to enclose the pollen saturated area, the stem of the flower will begin to swell and a seed pod will develop .
This seed pod may remain on the plant for several months until it is ripe, it is important that the pod is harvested before it splits as the seed may be lost or spoiled.
Not all seed pods will have viable seed.
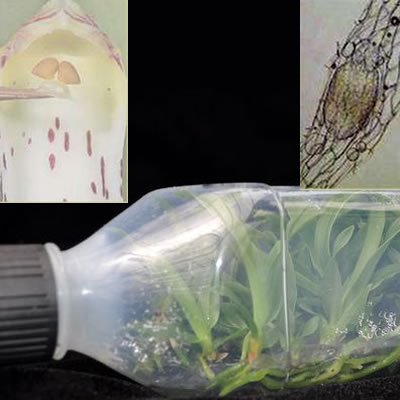
In order to ensure that no more time is wasted on them a sample of seed will be examined, they are so minute that a microscope is needed to see them properly even after they have been soaked for a few hours in a sugar water solution, which makes them easier to study.
On the top right, you can see how primitive an orchid seed really is, it consist of a single cell, which is contained within an open a fibrous network, and at this stage is extremely underdeveloped.
Symbiosis.
In nature, the orchid seed will only grow when exposed to a microscopic fungus, which helps to break down the sugars and nutrients for the seed.
The seed cannot survive without this symbiosis taking place, but as it is a hit and miss affair in nature; propagation in the hands of man has resulted in an alternative and more viable methods.
Growing from seed.
Firstly, as the orchid seed which has been contained in a sterile atmosphere within its seed pod may be contaminated by the wrong airborne fungal spores, and as it is about to be introduced to another sterile container ( a flask) it must be thoroughly sterilized to avoid being contaminated within its new environment.
A nutrient gel is prepared and sterilized, this will eliminate the need of the primitive seeds dependence on symbiosis.
The gel is allowed to set inside the flask, and the sterilized orchid seed is sown thinly across its surface.
Hopefully the seed sowing will have been successful and in a little time will germinate, and the surface of the gel will become covered with a mass of round green spheres, these are called protocorms.
These miniature orchids will be sown again into new flasks which may contain a stronger medium, and again this is done in sterile conditions, eventually from the thousands of protocorms originally sown only around 25/30 will be sown into the final flask. The task of replating (reflasking) may be done again and again as the plantlets mature and grow, and eventually they will become large enough to be pricked out and sown in regular orchid compost to continue and grow into flowering plants.
From seed to mature plant can take from three years upwards.
Propagating by division.
Orchids may be propagated by division, those whose growths are Sympodial, (that is one new growth appearing from the base of an older growth) lend themselves easily to such an exercise; taking a sterile blade, cut through the rhizome leaving ideally at least three growths on each portion, this can be done at any time, providing the plant remains undisturbed in its original compost until the next re-potting takes place, when you should have perfect divisions.
On Monopodial orchids (those whose new growth comes from the centre of the plant, the exercise is a little more complicated, and should not be undertaken lightly. Vandaceous orchids are of this type, and when a plant has reached a size too big for you to cope with, it may be cut down, providing that there are sufficient aerial roots on the cutting to make it viable, which can then be re basketed to grow on, the old stump should not be thrown away, as it may well produce several new growths from below the cut, and these may be eventually removed to form new plants or left as a splendid clump. Phalaenopsis orchids if damaged may produce several new growths from beneath the ruined crown, or a little keiki paste may be added to the nodes of a flowering spike to encourage the growth of plantlets, sometimes this happens without encouragement, and when the plantlets have enough root they may be teased from the parent and potted up.
Meristem Culture.
The growing tip of an orchid is used in this method; the growing tip is generally free from virus and disease.
Once selected and separated from the plant it is basically “mashed up” which will separate each individual plant cell, these are then sown in vitro in a flask and will eventually produce clumps of tissue which is again divided and re sown.
These small groups of cells will develop into perfect copies of the parent plant, this is the method which has produced orchids at reasonable prices due to the economy of scale.
Read POTTING Information...
Categories orchids, plants, propagation, North of England Orchid Society